Servo control using Raspberry Pi
Controlling servo motor using Raspberry Pi directly or with PCA9685 servo driver via I2C interface
Overview
This post covers how to control a servo motor from a Raspberry Pi.
There are two methods to control a servo motor using a Raspberry Pi: with direct PWM from Raspberry Pi, or using an additional PCA9685 servo driver via I2C interface. Using a direct PWM signal may be the easiest method, but come with more limitation: CPU usage for PWM signaling, limited number of pin for the servos, power safety risk, etc. On the other hand, controlling using an additional PCA9685 handles those limitation. The only requirement is to enable I2C interface for the communication.
This post explain how to use both methods. Please note that the Raspberry Pi is installed with Ubuntu image in this method.
1. Using PWM
To use PWM signal, wiringPi library is required.
With Ubuntu 16.04 image, installing wiringPi cannot be done directly using apt.
The following steps can handle the installation [1].
Installation
- Install dependency
sudo apt install build-essential sudo apt install libi2c-dev sudo apt install git-core - Install wiringPi
Note: cannot install wiringPi using apt install.cd ~ git clone git://git.drogon.net/wiringPi cd wiringPi ./build - Confirm installation
gpio -v
After the wiringPi is installed, you can try to play the gpio command to send PWM signal.
You can refer to Adafruit’s tutorial more more detail [2]. Here I only write the part after the wiringPi is installed.
Usage
Standard servo motors require PWM frequenct of 50 Hz.
\[pwmFrequency = \frac{Base Crystal Frequency}{pwmClock \times pwmRange}\]Note that base crystal frequency for Raspberry Pi is 19.2 MHz.
Example:
- Set pin 18 to PWM mode
gpio -g mode 18 pwm - Set PWM configuration
gpio pwm-ms gpio pwmc 192 gpio pwmr 2000 - Set servo to all the way to the left (pin 18)
gpio -g pwm 18 100 - Set servo to the middle (pin 18)
gpio -g pwm 18 150 - Set servo to all the way to the right (pin 18)
gpio -g pwm 18 200
2. Using PCA9685 servo driver via I2C interface
Installation
- Install
raspi-configwget https://archive.raspberrypi.org/debian/pool/main/r/raspi-config/raspi-config_20160527_all.deb -P /tmp sudo apt-get install libnewt0.52 whiptail parted triggerhappy lua5.1 alsa-utils –y sudo apt-get install –fy sudo dpkg -i /tmp/raspi-config_20160527_all.deb - Enable I2C
Note: depend on raspi-config menusudo mount /dev/mmcblk0p1 /bootsudo raspi-config- Choose 9 Advanced Options > A6 I2C. Follow the rest.
- Check the I2C port
- Run
ls /dev. - Confirm if the I2C port is set, e.g
/dev/i2c-1—> port 1. - Test detecting I2C on available port. E.g for port 1:
sudo i2cdetect -y 1
- Run
Using PCA9685
- (if necessary) Set locale
In case of setting locale to Japan:sudo locale-gen ja_JP.utf8 - Installing Libraries
sudo pip3 install RPI.GPIO
sudo pip3 install adafruit-blinka
sudo pip3 install adafruit-circuitpython-pca9685
sudo pip3 install adafruit-circuitpython-motor
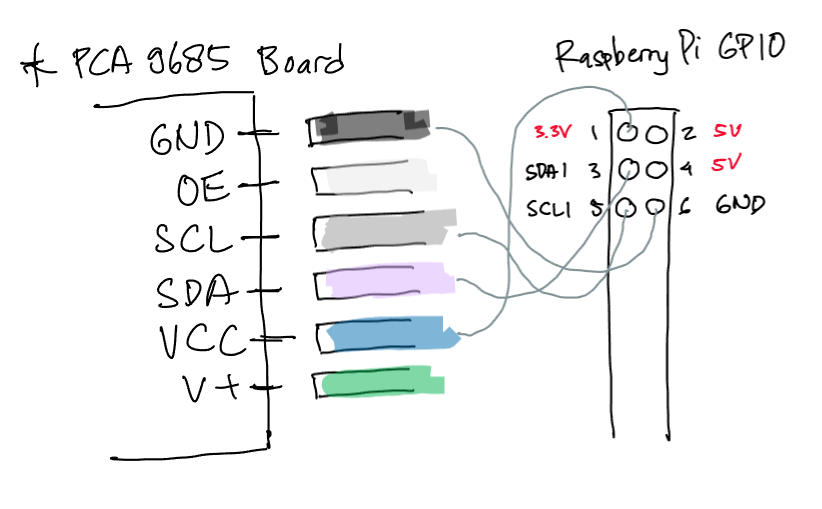
Refer to Documentation for Adafruit PCA9685 Library for examples and further documentation [3].
Afterword
Using PCA9685 via I2C interface is preferred.
References:
[1] https://qiita.com/frafrakki/items/3b14b0a318039e51dadd
[2] https://learn.adafruit.com/adafruits-raspberry-pi-lesson-8-using-a-servo-motor?view=all#software
[3] https://docs.circuitpython.org/projects/pca9685/en/stable/examples.html